Somewhere around 37 or 38 weeks, we will have our second prenatal visit. At this visit, we talk a little more in-depth about your birth, what your provider is saying, and what we can expect/prepare for. This is also when I teach you and your husband a few positions to try during labor that can help you relax, stretch, and/or help your baby to re-engage if we notice contraction patterns are inconsistent.
Three Balances: The Three Balances are three positions/stretches/movements that stretch your pelvic floor, release the fascia (the webbing throughout your body between your skin and your muscles), and create space in your lower uterus, allowing tendons to loosen and your baby to re-engage into a more progressive position. Click here to read more about the Three Balances.
Side-Lying Release: This position is a good one to do with assistance, but can be done without. Just be sure you have a chair to hold on to for balance - just in case. Using a comfortable, but flat surface (ideally at least as long as your body), lay on your side, your hips about four finger-widths away from the edge (your pregnant belly will probably be hanging off the edge a little), stack your shoulders and your hips, flex both of your feet, then lift the leg on top and let it release and hang in front of your body. You should be on a surface tall enough to truly allow your leg to hang, and the goal is to completely relax. Stay in this position for at least 5 minutes. Be sure to do this on both sides so that you can effectively stretch both sides of your pelvic floor. Click here to read more about the Side-Lying Release.
The Jiggle or Ripple: Between our skin and our muscles is the fascia. A web-like system that spans our entire bodies, like the white webbing you see on an orange after you peel it. When this fascia is relaxed, it allows your muscles to unwind and relax as well. The Jiggle/Ripple is best when it is performed by the husband or doula. It can be used during the SLR, but can be used when mom is lying on her side. The husband or doula places his/her hand on your hip or backside and gently vibrates his/her hand. Too hard and you'll be reaching the muscle, too soft and you'll only be reaching the skin. Try to move your hand as if you are making ripples on water. Do this for several minutes in one spot, then move to another and continue for another several minutes. Click here to read more about the Jiggle/Ripple.
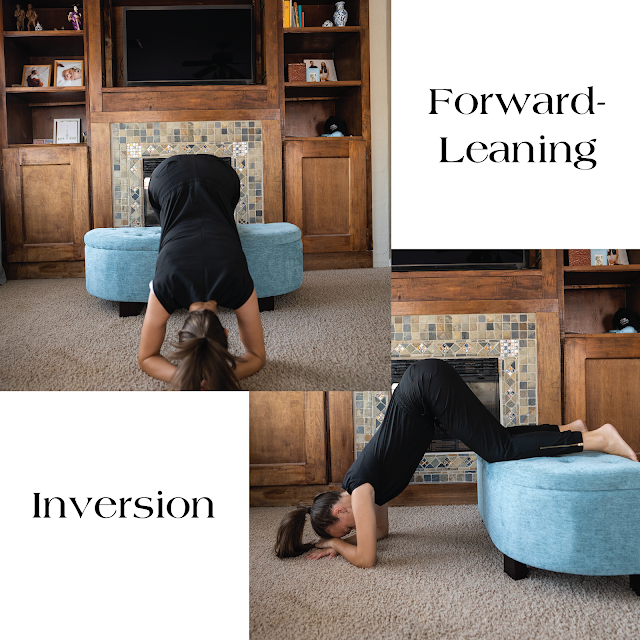
Forward-Leaning Inversion: The Forward-Leaning Inversion gives your body and your baby a chance to kind of re-set. We might try this position if we notice an inconsistent contraction pattern or think that baby may be mal-positioned for any other reason. It is accomplished by beginning on a raised surface, like a bench, couch, stairs, or chair. Start on your knees, then lean over and place your hands on the floor one at a time, then transition from there to your forearms/elbows. Relax your head and take three deep breaths before coming up, one hand at a time, until you're upright again. The more you practice this, the more your body and brain will get used to being in an upside-down position and the better you will get. You can do this once daily for about 30 seconds (3 deep breaths), or if asyncliticism or other poor-positionings of the baby is suspected. Click here to read more about the Forward Leaning Inversion.
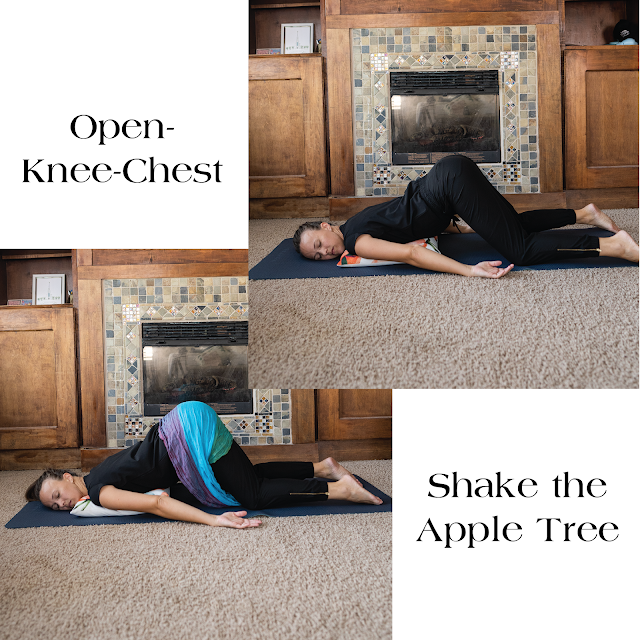
Open-Knee-Chest: This position is best achieved with the help of one or two others. Begin on your knees, then bend over to lay your chest and face on the floor, slide your chest a little further forward, then rest your chest on a pillow (not your face). The first helper takes the scarf and wraps it across your pubic bone, below your belly NOT over it, and pulls. The second helper - if available - can stand at your head so that you can use the helpers ankles to hold your shoulders in place. This position helps to open the top of your pelvis, but will ONLY help if it is maintained for 40 minutes. This is another option to help baby to re-engage. To learn more, click here.
Shake the Apple Tree: Shaking the Apple Tree can be done while you are leaning over on a bed, on your hands and knees, or standing. Have your husband or coach wrap a scarf across the mother's bottom and shake! He can also use his hands. This helps relax the muscles and can be done for as much as 10-20 minutes depending on how much you like it!
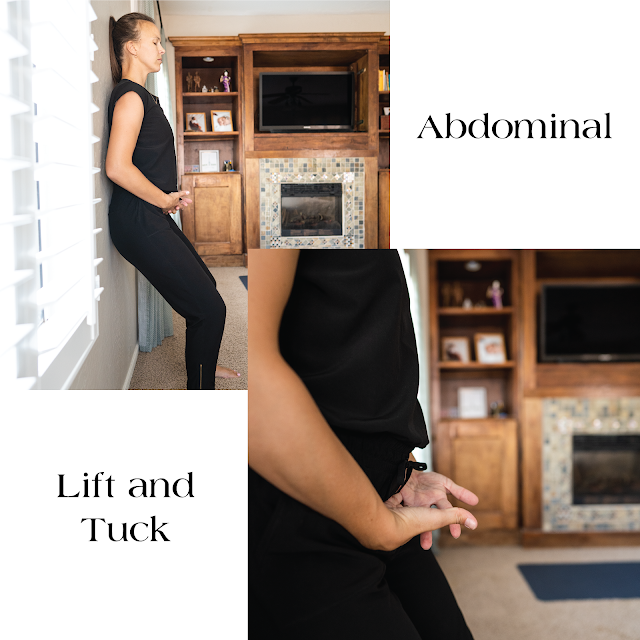
Abdominal Lift and Tuck: Another great position for if baby is not ideally positioned, or even if they aren't fully engaged, possibly on the outside of the pelvic lip. Stand with your back against the wall, interlace your fingers and place against your pubic bone pushing in and lifting up as the contraction begins, then releasing as the contraction ends. This position is only really helpful if it is done for 10 consistent contractions. It can also be done with the assistance of your husband who puts his own back up against the wall, you put your back on him, and he laces his fingers under your belly on your pubic bone, then presses in and lifts. You let yourself relax as he does this. Begin at the beginning of a contraction, release at the end, repeat for 10 contractions.
Counter Pressure: Counter Pressure is amazing for relieving pressure in certain areas of the pelvis during birth, but you must be intentional about its use. You may be doing a double hip squeeze at the top of the pelvis, but baby hasn't engaged low enough and you are actually hindering the baby's progress because your hip squeeze effectively relieves pressure, but also closes the top of the pelvis. The same goes for pressure on the back at the top of the sacrum.
Both of these counter pressures must be administered by another person, but because all of my assistants were otherwise engaged at the time I had to take these pictures, I chose to just show you with my own hands the general area that you'll want your birth team to administer pressure. You will be able to tell them exactly where during labor, and how hard they should be pressing. AGAIN, reserve these counter pressures towards the end of labor when you are well-established and your baby is likely to be positioned at a lower station.
Double Hip Squeeze: Teammate, place your hands on either side of the mother's hips, trying to find the place where her pelvis kind of curves in and press. Don't worry about hurting the mother, and lean your body in to help you get more pressure if she asks for it. She will be able to tell you if your hands are in the right place or if you are pushing enough. Be sure to save this counter-pressure for when you know baby is well engaged. Pushing on the top of the pelvis in this position helps relieve the pressure in the outlet of the pelvis as it helps to open it up and create more room for the baby. If your baby is not well engaged, you are making the inlet smaller which is not helpful for baby's progression.
Sacral Pressure: I like to use a tennis ball for this one to save my own wrist/palm from fatigue. Place the tennis ball right at the top of the sacrum and use the heel of your hand to press down. This is especially good for mothers with back labor as oftentimes the tip of the sacrum or tailbone is what is carrying a lot of pressure, so pushing on the top of the sacrum helps to move that out of the way. As with the Double Hip Squeeze, save this for when baby is well-engaged.
And there you have it! The major positions I like to go over with you at your Second Prenatal visit! There are other positions that you may wish to use during labor. My main purpose is to go over the ones that take a little extra time to explain and practice so that we can get it sorted out before you go into labor and you know exactly what I'm talking about when I say "shake the apple tree."
Best of luck, Mamas! I am so excited for you!
_____________________________________________________________________________________


No comments
You left me a comment! *fist pump*